From Johnnie Candle pro walleye angler and full time guide on Devils Lake.
I use this method to target individual fish using the I Pilot link to a Humminbird Core model, Helix or ONIX. I Pilot Link makes fishing for individual fish incredibly easy. When graphing a location, I will have my trolling motor in the water. With the new Ulterra, I don’t even have to get out of my seat to do this. I will have my Helix or ONIX in split screen mode with the active side being the sonar side or just the sonar screen. If I mark a fish that I want to target, I will place the cursor over that fish and create a waypoint.

Stop the boat, then using the menu or the touch screen to spot lock on that waypoint from your Humminbird. As the boat drives itself to that waypoint, I have time to grab my fishing rod and be ready to fish when the boat arrives to that fish. It is amazing how many times you will catch that fish.
Live Mapping
Making your own maps of your fishing spot live is quickly evolving. I started with DrDepth on my boat laptop.
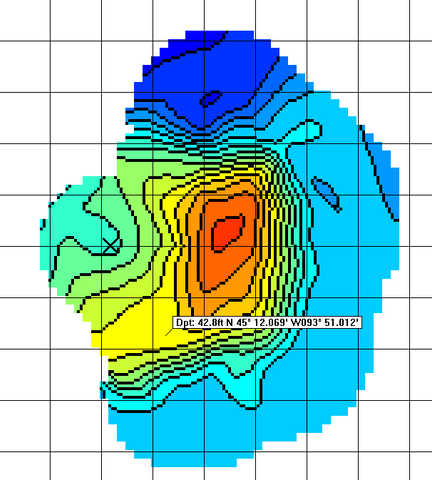
I now use Humminbird AutoChart Live.

Using live mapping on your GPS screen is the best since it is easily viewed and Humminbird really simplified the process.
You have 2 other choices, Navionics Live SonarCharts which is done on a phone or tablet.

This image is using the Vexilar SonarPhone and a tablet.
Garmin just released its version of live mapping called Quickdraw.
Garmin sample image

You have lots of choices so if your maps suck what are you waiting for?
We all struggle with interpreting the sonar at times.
For example, this big blue arch can be puzzling when you first see it.

I usually run my sonar in splitscreen with down imaging which often gives me the answer.
The down imaging shows the blue arch as a bait ball.
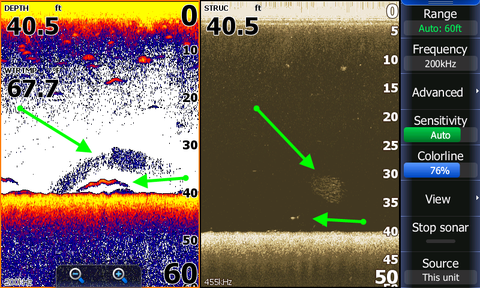
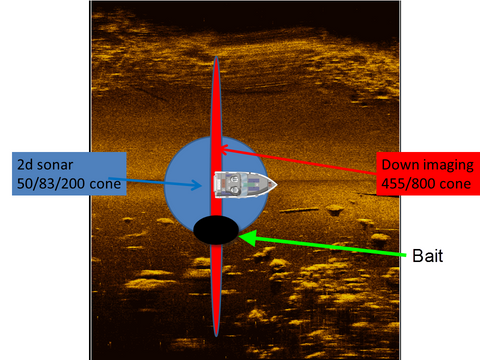
Since the blue arch is unusually shaped and blue and not dense I conclude it is the bait on the edge of the 2D cone. I bet the bait was located near the black circle in the below image. The wider cone of the down imaging shows the bait better.
Sonar Training Humminbird Snapshot
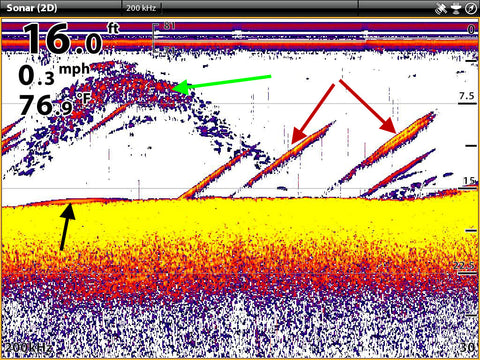
Black arrow is a fish close to the bottom
Red arrows are air bubbles
Green arrow is bait or fish on edge of sonar cone
Fish close to the bottom display as bumps on the bottom.
Air bubbles are caused by decaying matter at the bottom and show up as diagonal lines.
Bait or fish on the edge of the cone display as blurry and not dense with unusual looking arches.
Home map research pays off
Last weekend was South Dakotas Largest fishing tournament of the year. It brought 1050 ice anglers to Lake Oahe. With the tournament being near the holidays and having a baby in late fall I wasn't going to be able to prepare for this tournament on the water. Instead I broke down Doctor Sonar map card at home on my Lowrance fish finder. The detail of the map enabled me to narrow down my target area to only a handful of what I felt was high percentage spots. I found one area that had 3 high percentage spots within close proximity of each other so I decided that's where we were going to go tournament day. This was going to be a put all your eggs in one basket strategy due to the location and poor ice conditions.
When we arrived at the location one spot was already taken so we went to the 2nd spot on the list. It was Main lake point next to deep water with a nice deep ledge and feeding shelf. We decided the best way to attack this spot was to get into position with the Lowrance GPS and Docs map card. We then wanted to cover all depths of the point edge so we could find what depth the fish were in. This is critical. We spread lines from 15-55 ft. It didn't take long and the deep tip up got bit. Within 2 hours we had moved the shack and all of our gear out super deep. Once we got the depth right, the point and shelf just funneled the migration of fish right past us. In a short 5 hours of fishing we had caught around 40 walleyes. 5 of those walleyes being weighable fish. We were happy with that because it was our first time ever ice fishing Lake Oahe.


We ended up finishing 19th out of 525 teams. We considered that a great success since we relied purely on our Map Card and a theory. So next time you are thinking about hitting the hard water take your GPS with you and do a little homework. You may surprise yourself on how quick you can put a pattern together.

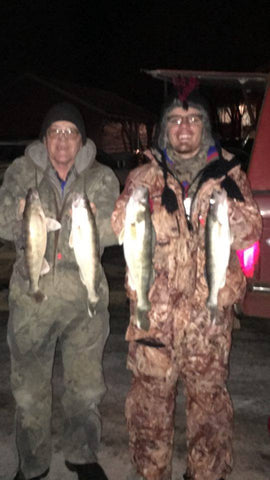
I get questioned about how to use an underwater camera in summer when the algae bloom. The images aren’t as good as spring and fall but I can still identify the species. I use my Aqua-Vu Multi-Vu Camera System attached to my Lowrance Gen 3 with the optional video in power cable so we can all view the secrets of the deep on the Lowrance! Sometimes it is too much fun and I forget I am fishing. Yesterday the fish weren’t biting and I dropped the camera but there was a big algae bloom on my lake and I couldn’t see below 12 feet well. I looked up and my bobber was down with a 21 ½ inch walleye. Nice thing about bobbers is you don’t have to pay attention and you can still catch them.

I was wondering about these fish since I was hunting bluegills and dropped the camera on another dark water lake. The images are poor but I was able to identify them as perch. Too bad they were too small to fillet! Perch are one of my favorite fish to eat.
The images show the school of perch and the short weeds.
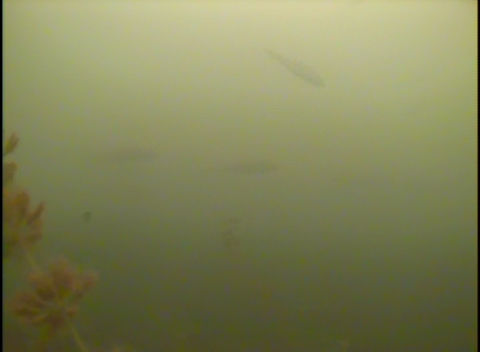
I use the camera to identify what I am seeing on the sonar since I teach sonar I need to be as exact as I can when i say that looks like _______.
Since I now live on a lake I decided to map it with AutoChart Live on my Humminbird ONIX. I use a zero lines SD card to record the data to since at the present time if you record to the internal memory you can’t get the data exported.
I started mapping the closest area before I went out fishing and mapping.
This image is showing the start of the mapping. The single colored bands are one pass.

Notice the improvement as I collect more data.

I used to do this with DrDepth and my laptop but using AutoChart Live is much easier.
I have found a few spots not on the regular Navionics and Lowrance map chips and I plan to keep this map just for me since I like eating fish and secret spots are a treasure to be protected for my family.
I suspect it will take all year to map the lake accurately since I stop to fish since fishing is more important than mapping.
The process is very easy, press menu and select AutoChart Live, and this menu allows you to select record which starts the process and make sure you have the AutoChart Live box checked.
Notice the Save Location box, you select this and I recommend using a AutoChart zero line card to record instead of the internal memory so you have your recorded data for later use. The internal memory only allows 8 hours of recording time.

This is not a toy but an important fishing tool for structure fishermen.
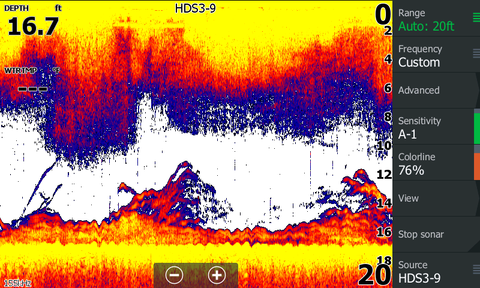
Do you think this is a good spot to fish? Make a guess what you see, I am fishing vertical in waves so everything is wavy looking. The screenshots are from Humminbird ONIX with the all in one transducer using 200 kHz. The Lowrance Gen 3 is using the Airmar TM150 transducer on fixed frequency 145 kHz. I run both at the same time for comparison and if I see a fish on just one transducer I know which side of the boat it is on!!!!


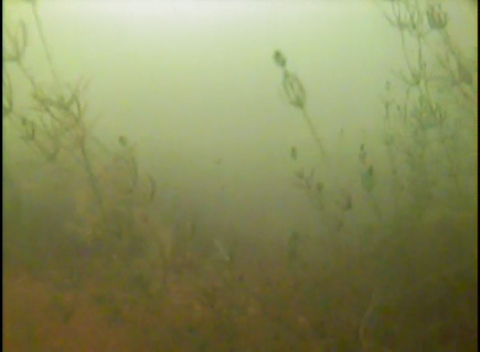
I was fishing weeds like these since all kinds of fish like emerging weeds.
I tried slip bobbers, jigs and rigs with no bites so my friend and I took a look with my AV Multi-Vu Complete Camera System which has no screen but a plugs into my Lowrance Gen 3 and I use it as the screen.

Well, I was wrong again! I thought I was seeing fish in the weeds but I looked for a long time and never saw a fish but saw many tall weeds lying horizontal so the sonar did not show the weeds as attached to the bottom and they then looked like fish to me. I have said for years the best use of a camera in the boat is if you see fish and can’t get them to bite look with the camera to confirm if you are reading your sonar correct. Many times the fish are the wrong species and like this time unusual weeds.

Boat Electronics Mild to Wild.
I work a number boat shows every year for Lowrance Electronics and I wish I had a dime for every boater/angler that walks up to the electronics display and stands there in bewilderment and awe of the latest techno-gadget to see the depth and fish.
As they ponder upon the latest electronics gadget for bit as they take it all in, I will strike up a friendly conversation asking how their day is going, if they have had enough of winter, and if they have any questions or concerns on the new techno-fish finding gadget and 90% of them do.
Here is a list of questions I will ask a boater/angler to find out what their needs are…
● What sonar do you have now?
● What kind and style of boat?
● Tiller or console?
● Type of fishing?
● Do you do lots of casting? A Point 1 GPS module with a heading sensor may be helpful to help them pinpoint structure.
● Budget?
● Screen size? You will never regret going bigger, just make sure it will fit in the intended space.
● Are you going to keep your existing equipment?
● Do they want a stand-alone or they interested in multiple units?
● If they have multiple units. Explain how units can be networked together
● And the latest sonar technologies DownScan, SideScan, CHIRP, GPS etc.…
You can spend less than $100.00 for a quality stand alone sonar unit if that’s all their budget allows, and meets the criteria for your fishing style. Or the skies the limit with multiple networked sonars with StructureScan technology, stereo, auto pilot and more!
There are many options in rigging electronics. Keep in mind if you plan on using 2 stand alone sonars such as the Lowrance Elite series on the bow with a transducer on the trolling motor and the other on the console with the transducer on the transom, you could run into cross talk if both units are used on deeper water. There are some ways to alleviate this by setting each unit to run on different frequencies or adjusting ping speed if they are capable of making these adjustments. Or going with units that are networkable, units like the Lowrance HDS series you can select which transducer to source to read.
Here is an overview of NMEA 2000 and Ethernet capabilities.
● NMEA 2000 shares data such GPS modules, engine data, limited waypoint management, Sonic Hub, autopilots control for a bowmount trolling motor or a main engine auto pilot and more. NMEA 2000 requires a separate power source to power this network.
● Ethernet shares data such as map cards, waypoint management, syncing multiple sonars, weather modules, screens and more…
Once we go through all these questions, we can then work together to formulate what would work best for their needs. Lets run through a couple of scenarios on various types of boats and budgets.
● Tiller or console boat with no intentions of networking. Here is where the Lowrance Elite series excels; depending on your budget you can go up from a 3” screen all the way to a 9” screen. You can get DownScan, CHIRP and GPS in this series, these are a user friendly units basically a plug-n-play and go fishing units.
● Console boat with a bow mount trolling motor. This boater wants 2 sonars and wants to save some money, look at going with 2 Elite series units. One on the console with a transom transducer and the other on the bow either using a built in transducer if equipped or strapping on a external transducer. Certain Elite units have limited networking capabilities via a NMEA 2000 network with limited waypoint sharing and can share a POINT 1 GPS module. Keep in mind you may run into crosstalk issues in deeper water. (Example 1 and 2)
● Console or tiller boats is where a customer wants all the bells and whistles. Multiple sonar units networked together via Ethernet and NMEA 2000. This is where units like the Lowrance HDS units come into play, a customer might have 2 HDS units on the console one for sonar/StructureScan and the other for GPS Mapping, and HDS unit on the bow connected to the built in trolling motor transducer and another HDS unit on the transom to view while trolling. (Example 3,4,5 and 6)
Here all units would be connected via Ethernet and NMEA 2000. The Ethernet cable will be daisy chained between sonar units, weather module if installed, basically plug-n-play. NMEA 2000 would also connect to all the units that require NMEA 2000. NMEA 2000 is a bit more complicated and requires some additional components such as a power node, tees, cables and end cap resisters. See the attached photos of Ethernet and NMEA 2000 set-up.
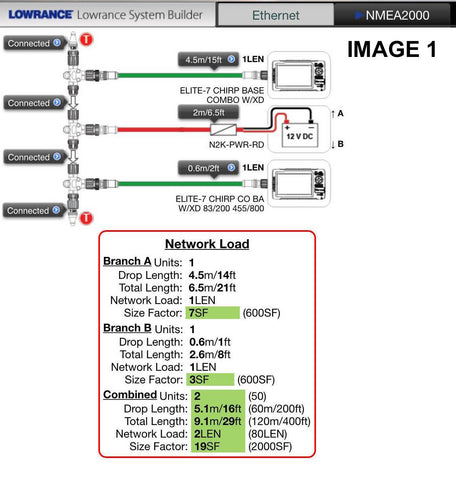
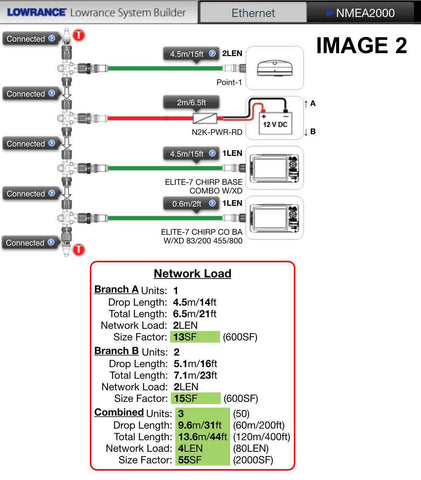
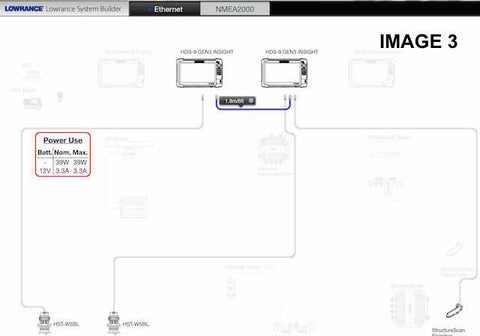
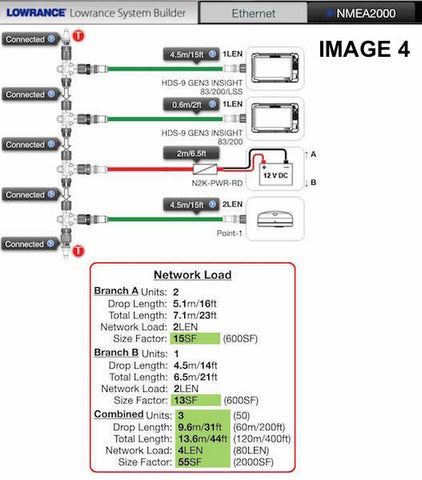
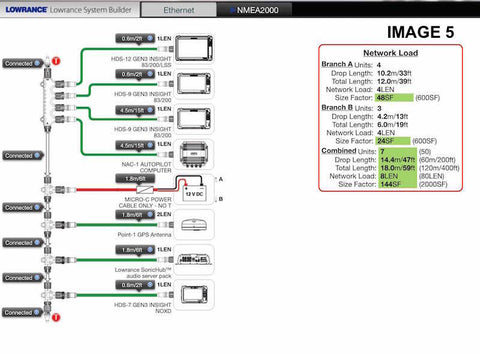
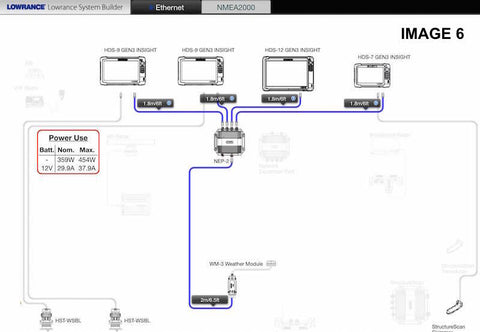
As you can see there are endless combinations of sonar and component configurations available. When in doubt look for a sonar representative or a store associate for advice.
Hopefully this article helped you to make a decision on a sonar package that will fit your needs.
Kirt Hedquist
Kirt Hedquist Outdoors LLC
Doctor Sonar and Lowrance Pro Staff
By Doctor Sonar Pro Staff Kirt Hedquist
Have you ever found Walleyes live bait rigging or pulling spinners, and the fish have been in a positive mood, biting all day.... and then they just plain shut down? The Lowrance is still marking fish but they have become uncooperative and are holding tighter to the bottom, no longer taking your faster presentation?
I live by the motto - Don’t leave fish to find fish. It’s time to get down to their level, and hunt them down.
Armed with a Fin-tech NuckleBall Jig tipped with a minnow, a good jigging rod like one of St Croix’s Legend Tournament Series, a top quality spining reel loaded with superline, and a Lowrance HDS series with Navionics Mapping is key to find those fish that are holding tight to the bottom. Mark your waypoints where the fish where biting earlier as a good starting point. Move around slowly looking for that slight separation or change in the bottom indicating a fish. Drop the NuckleBall jig down into the fish, and use various jigging strokes. This technique is where the Lowrance HDS Sonar unit’s really shine; the jig can be clearly viewed as it approaches the fish, and the jigging motion is easy to see. When a fish smacks that jig, the superline and St. Croix will leave little doubt; set the hook hard!
Start by lifting ithe jig slowly up and down to see if this will entice a strike. If this fails, change up the cadence by holding the jig stationary in the fish’s face, and if this fails drop the jig to the bottom; the stand up head design keeps the bait pointed up in a tantalizing position and an easy meal will be tough to resist.
If fish are not being marked at the waypoints where they were biting earlier, start moving circularly outward, slowly scanning the bottom. The fish may have moved off to a subtle break, slipped out to deeper water, or moved to near by rocks. When they are relocated, repeat the same procedure as above and SLAM 'em!


