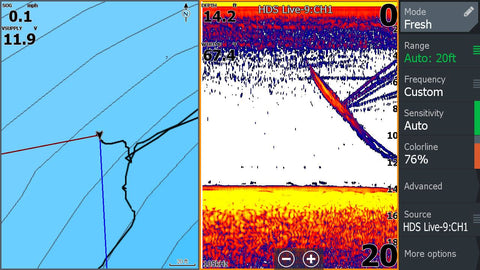
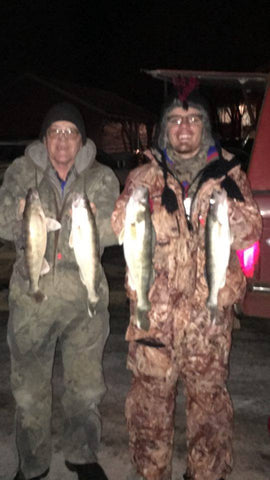
Side scan saved the day. the weed, sand and mud edges were easily seen. The little sand dip in the weeds is where we found walleyes. They were on the sand right next to the weeds.
No wind, clear water and sunny. Only bass shallow so we looked deeper and found some at 22 foot.
Top arrow is mud
2nd arrow is sand
3rd arrow is weedlines
Bottom arrow is weed dip

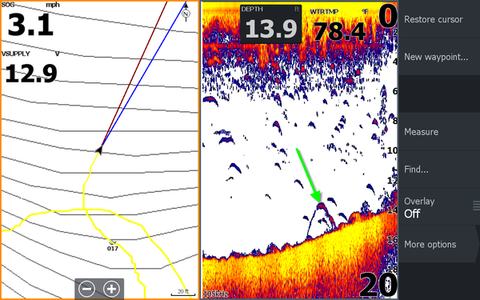
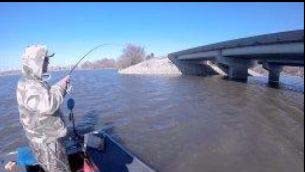
We were using spot lock to cast for walleye and Levi said look at the sonar. I quickly reeled up and dropped my jig and caught a 4 lb largemouth bass. The 2nd photo is the bass swimming away after I released it.


Notice the 2 bright yellow arches (green arrow) in the red bait (black)

I looked at lots of areas and didn't see any fish and caught fish. But here is one example where the fish showed up.

Fish in vegetation, you don't have to see fish to catch them. I often don't mark fish in weeds but still catch them like this one. I spotted the fish with my Aqua-Vu and dropped my bait near the camera!


Green arrow shows nice fish on down imaging but looks small on 2D. It is probably on the edge of the 2D cone and the DI cone is wider so shows the fish better.
Reason to run DI and 2D sonar. I also use Navionics on my Lowrance and LakeMaster on my Humminbird. DI (down imaging) is better in weeds most of the time.


My Garmin PS30 shows the distance to the side the fish are.
Green arrow 3 feet to the left of the transducer which is mounted on boat's mid-line.
White arrow 8 feet to left.
2D sonar only tells you how far off the bottom and that the fish in the cone somewhere.


#6
Red circle fish
Black arrow weeds
Green arrow small boulders on hard bottom point.
Blue arrow bait balls that create shadows on side scan.

This should help get started in interpreting your sonar.
Lots of anglers like to troll, whether it be the great lakes, rivers and small lakes. Trolling is an effective way to catch fish, you cover lots of water and you can cover the water column effectively searching for active fish, the fish are always biting somewhere. I have won 2 championships trolling over the years.
There is some science behind trolling, you need to know the depth your lures are running and there are a number of determining factors on how deep your lure or bait is running. Type of lure, size of lure, line size, with or against the water current and the amount of line between the rod tip and the lure. Pretty much every lure or bait as dive curve based on specific data gathered, a great tool for dive curves is the Precision Trolling app, it’s a pretty slick deal the folks Precision trolling have taken the time to map this data out for easy reference.
There is one thing that maybe often overlooked the amount of line on the line counter reel. Have you ever spooled up your trolling reel and said well ½ full is enough line and why waste the line? There is a method of verifying that the amount of line let out matches the number on your line counter reel, its called calibrating your line counter reel, many seasoned trollers know about this. When you let out a 100’ of line is it really a 100’ or is it 60’?
Try this next time, measure out a 100’ in your yard or wherever, set your line counter rod reel up counter zeroed out and pull out the line and see where your line counter ends up, you may be amazed at where it ends up!
I spent some time playing with the amount of line on the reel vs the distance shown on my line counter reel. I use the Abu Garcia Alphamar size 16 Line Counter reels they are capable of holding 370 yds of 15# mono line, capacity varies with line weights. They are designed to use all sizes of line and most line counters should have this data on them or available online. Line counters are designed to be the most accurate with a full spool of line.

I started out by spooling 800’ according to the line counter which put it at about 1/3 full on the spool, set the counter to zero and walked out to 100’ mark and looked at my counter and it said 165’! Doing some guestimation here and letting out what is presumed to be 100’ of line is only approx. 60’ of line approx.
So here is the scenario on the water with this much line on my reel because thinking that a reel 1/3 full was enough. Driving around marking suspended fish at 14’ down, open the handy dive app and it says a #7 Flicker Shad will dive to 13’ with 100’ of line out. Setup on trolling run letting out supposedly 100’ of line to get the Flicker Shad down to the required fish catching depth in reality it’s only approx. 65’ at a depth of 10’ falling short of where the fish are in the water column totally missing the fish and letting the skunk into the boat.

While experimenting with how full the spool was vs the distance out, I added enough line to fill it half way approx. 1000’ of line, at this point I zeroed out my line counter and pulled out enough line to reach my 100’ marker and the line counter now showed 139’ of line out I added another 200’ of line and tried it again and this time I was at 128’ on my line counter. As you can see the fuller the spool the more accurate the counter became. I did some more guestimation math in my head and added enough line to bring the spool up to full capacity which equated to 2000’ on the line counter. Again I pulled out enough line to reach my 100’ marker in the yard and I was at 105’, I added another 50’ of line and was at 97’ this time, I removed about 20’ of line this time and I hit 100’ right on the money. I double checked this a couple of times and it repeated itself.
With this in mind I repeated the same process of spooling up 2000’ on the reel line counter to my other 3 Alphamar 16 reels and each time I was within 4’ + or – of 100’, using the info I had found above I fine-tuned all my reels so each reads 100’ at my yard marker.

I also have some Abu Garcia 5500 LC’s with 300yds of 14# Fireline that I use for trolling and bottom bouncing and I repeated the same procedure as above. Because I didn’t want to fill my entire spool with Fireline and used Berkley Trilene Big Game 10# test backer initially, I measured on 300 yds of the Big game monofilament backer material then added my Fireline main line. I tested this with my 100’ marker and it came out to 99’, got lucky on this calculation.
Some tips on calibrating linecounters-
Bottom line don’t short yourself on your trolling rod set ups spend some time calibrating your reels and keep the skunk out of your boat.
Last weekend was South Dakotas Largest fishing tournament of the year. It brought 1050 ice anglers to Lake Oahe. With the tournament being near the holidays and having a baby in late fall I wasn't going to be able to prepare for this tournament on the water. Instead I broke down Doctor Sonar map card at home on my Lowrance fish finder. The detail of the map enabled me to narrow down my target area to only a handful of what I felt was high percentage spots. I found one area that had 3 high percentage spots within close proximity of each other so I decided that's where we were going to go tournament day. This was going to be a put all your eggs in one basket strategy due to the location and poor ice conditions.
When we arrived at the location one spot was already taken so we went to the 2nd spot on the list. It was Main lake point next to deep water with a nice deep ledge and feeding shelf. We decided the best way to attack this spot was to get into position with the Lowrance GPS and Docs map card. We then wanted to cover all depths of the point edge so we could find what depth the fish were in. This is critical. We spread lines from 15-55 ft. It didn't take long and the deep tip up got bit. Within 2 hours we had moved the shack and all of our gear out super deep. Once we got the depth right, the point and shelf just funneled the migration of fish right past us. In a short 5 hours of fishing we had caught around 40 walleyes. 5 of those walleyes being weighable fish. We were happy with that because it was our first time ever ice fishing Lake Oahe.


We ended up finishing 19th out of 525 teams. We considered that a great success since we relied purely on our Map Card and a theory. So next time you are thinking about hitting the hard water take your GPS with you and do a little homework. You may surprise yourself on how quick you can put a pattern together.


The correct set up for any presentation is important. This particular set up is what I use for Jigging Rapala style baits. A baitcast reel with a flipping mode is a must when running this setup (Abu Garcia Silver Max). I will have one left handed and one right handed. So I can run one in each hand and free spool with the flipping switch as needed. Second you need a fairly heavy but still sensitive rod. I prefer a 7 ft medium heavy Fenwick HMG. Third you need the right line for the job. With Jigging raps heavy line is preferred because you will be ripping these baits in heavy cover and rocks. So I use 20 lb. Berkley FireLine crystal. Last but possibly most important is the leader. I use 3ft Berkley flouro leader in 20 lb. test. The leader keeps fish from seeing the line. I join the lines together using a double uni-knot. Then add a snap on the end.
I use a similar set-up for my Salmo Zipper and Chubby Darter plus the Moonshine Shiver Minnow.

Winter crappie fishing in Kansas can be the fastest action most anglers will have all season

If you are not using slip bobbers you are missing a great opportunity.
I love fishing because of the challenge. There isn't any one answer on how to catch them and there are multiple pieces to the puzzle to catching suspended crappies. This example is just one way to put some fish in the livewell.
First we find them with sonar.

Drop Shotting is similar to vertical jigging for fish. A hook is tied a few inches above the weight instead of a jig at the end of your line. The principal is the same as ice fishing when you see your lure with your sonar and can see fish close to the lure. It is much harder in open water since the lure and the transducer move. You need a calm day or superior boat control to keep the lure below the transducer.