#1 Walleye fishing
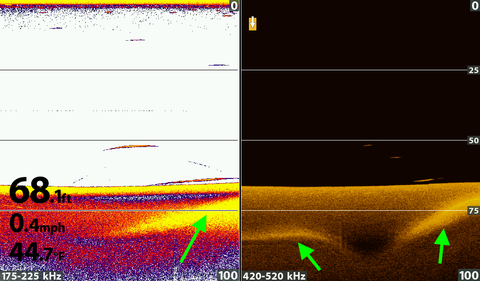
Side scan saved the day. the weed, sand and mud edges were easily seen. The little sand dip in the weeds is where we found walleyes. They were on the sand right next to the weeds.
No wind, clear water and sunny. Only bass shallow so we looked deeper and found some at 22 foot.
Top arrow is mud
2nd arrow is sand
3rd arrow is weedlines
Bottom arrow is weed dip

#2 Pay attention to sonar.
We were using spot lock to cast for walleye and Levi said look at the sonar. I quickly reeled up and dropped my jig and caught a 4 lb largemouth bass. The 2nd photo is the bass swimming away after I released it.

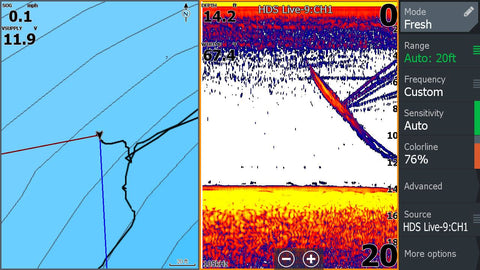
#3 Fish in bait show up well.
Notice the 2 bright yellow arches (green arrow) in the red bait (black)

#4 Sonar in vegetation usually sucks.
I looked at lots of areas and didn't see any fish and caught fish. But here is one example where the fish showed up.

Fish in vegetation, you don't have to see fish to catch them. I often don't mark fish in weeds but still catch them like this one. I spotted the fish with my Aqua-Vu and dropped my bait near the camera!


Green arrow shows nice fish on down imaging but looks small on 2D. It is probably on the edge of the 2D cone and the DI cone is wider so shows the fish better.
Reason to run DI and 2D sonar. I also use Navionics on my Lowrance and LakeMaster on my Humminbird. DI (down imaging) is better in weeds most of the time.

#5 Difference in cones from different transducers.
My Garmin PS30 shows the distance to the side the fish are.
Green arrow 3 feet to the left of the transducer which is mounted on boat's mid-line.
White arrow 8 feet to left.
2D sonar only tells you how far off the bottom and that the fish in the cone somewhere.


#6
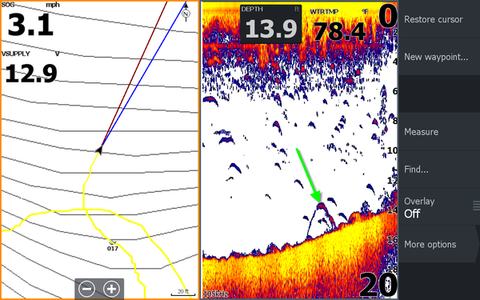
Red circle fish
Black arrow weeds
Green arrow small boulders on hard bottom point.
Blue arrow bait balls that create shadows on side scan.

This should help get started in interpreting your sonar.
Doctor Sonar’s choice is the FL-28 because its noise rejection is really good and the only brand I know that can be used close to each other without crosstalk. This is a big problem since people swarm to the fish and set up close to each other.
Ice fishing is mainly for crappie and panfish in northern USA. The sonar is used for video fishing. You watch the jig and fish on the sonar just like dropshotting but easier since you are stationary.
The below article is written by Sean Ward
Fishing doesn’t have to be complicated - and for many anglers, ice fishing offers an even simpler approach to angling than any other method.
After all, there’s no boat or motor to mess with - you don’t even have to worry about the water conditions. Everything is covered in ice!
However, if you’re a modern-day ice angler, you have probably wondered whether you should buy a flasher or a fish finder.
There are very few inventions that have revolutionized ice fishing quite like these two - but it can be difficult to know which one is right for you.
So which will it be - a flasher vs. fish finder for ice fishing? In this guide, I’ll tell you everything you need to know.
Flasher vs. Fish Finder - What’s the Difference?
Whether you go with a flasher or a fish finder, at the end of the day, your goal with both will be the same.
Both kinds of devices can show you the depth of the water, how the fish are responding to your lure, and whether there are fish down there.
Both devices will also offer you real-time sonar that will let you know what's happening at each moment beneath the ice.
However, there are some key differences between the two.
Display
The display will be the biggest difference between a flasher vs. fish finder for ice fishing. Ultimately, the one you choose will come down to your preferences.
A flasher has a simple dial with bright, multi-colored lights. These depict everything detected by the sonar beneath you, including fish, the bottom, and your lure as it moves through the water column.
The biggest advocates of flashers will tell you that flashers are better because they can be modified and fine-tuned so that you can see every detail, from the size of the fish to how your lure looks.
There are also innate zoom features.
However, if you’re new to using a flasher, you might need some practice to interpret what the lights and colors mean.
They aren’t quite as intuitive to use as fish finders, which are depicted as graphs and tend to be a lot easier to understand.
Another feature of fish finders that are ideal for novice anglers is that they come with RTS windows.
This display will give you a history of what happened just a few moments ago - something that is incredibly convenient if you happen to look away for a minute or pop out to check on a tip-up.
Nevertheless, both kinds of fish finders offer remarkable detail and attention to separation. You can learn how to interpret either with just a bit of practice, although flashers are nice when it comes to displaying real-time information.
Season
One of the biggest advantages of using fish finders is that they can be used year-round, during open-water seasons as well as ice-fishing seasons.
Flashers, on the other hand, are only really used for ice fishing. While you can sometimes modify a flasher to use it in open water, its uses are going to be a lot more limited.
GPS
When it comes to finding the right spots for fish, GPS is essential. A fish finder with built-in GPS and mapping features will make it much easier to land your catch - this is one major reason why many anglers choose fish finders over flashers for ice fishing.
Flashers don’t usually come with GPS capabilities, so you’re going to need to use a handheld GPS if you want to mark a spot or see detailed contour or base maps.
Battery Life
Another benefit of using a flasher is battery life. Die-hard flasher enthusiasts will decry the battery life of most fish finder devices.
These tend to have very bright LCD screens, which suck up a lot of juice.
Of course, an easy solution to this is just to turn down the display. However, on a bright day, that’s not always practical.
With a flasher, you can expect about 18 hours of battery life on a full charge. For most fish finders, that’s only going to be about 12 hours, maximum.
You’ll likely use even more battery if the weather is cold or you are using the GPS function.
Cost
Last but not least, the cost. High-quality electronic flashers can cost up to $750 or so, while top-rated fish finders will be just a little bit less (most don’t cost more than $700.
However, the price can vary depending on the quality.
The price difference here is negligible - the difference between the two will really be how much use you want to get out of your device.
If you want something that can be used year-round, the fish finder is the way to go - you might get more bang for your buck that way.
The Best Flashers & Fish Finders for Ice Fishing
The world of ice fishing is generally dominated by three major companies - Humminbird, MarCum, and Vexilar. All three provide excellent products that can be used in a variety of settings.
The Vexilar FL-18 is one of the best flashers you can get for ice fishing. It offers a simple, intuitive display with a ½” target separation so you can see the most minute details.
With a 12-degree transducer angle, it’s easy to use in just about any ice fishing hole. It also has ten separate interference settings, a zoom feature, and a sonar that works in up to 200 feet of water.
When it comes to fish finders, you might want to consider the Humminbird Ice Helix 5. This works well for anglers who want to fish through the ice as well as in the open water.
It has a 2.5” target separation and dual transducer angles of 20 and 60 degrees each.
It also has built-in base maps for more than 10,000 lakes in the United States, so you don’t have to do a ton of research or gather up extra maps or materials before you go fishing.
A GPS-equipped fish finder, it has an adjustable sonar zoom and can also be used with a boat mount transducer - it’s the most versatile multi-season machine.
The MarCum M3 is another one of the leading ice fishing flashers. This elite product has a remarkable one-inch target separation along with a 20-degree transducer angle.
You’ll enjoy a wider search angle along with zoom that can be customized at any depth in the water column.
The sonar on the MarCum M3 works to 160 feet, and it has an easy to use transducer cable arm. This is a unique feature of this flasher since most come with a float.
Many anglers find this design much easier to use.
Flasher vs. Fish Finder For Ice Fishing: Which One is Right For Me?
When you’re trying to decide how to spend your money on the latest ice fishing gadgets, it can be an overwhelming decision, to say the least.
You want to get your money’s worth (of course) but knowing which option to choose can be a challenge.
If you're just an occasional ice angler and don’t spend a lot of time fishing in the open water, you’ll probably want to go with a flasher.
These devices are best suited for dedicated ice fishing, while fish finders will be better if you’re looking for something that offers all-season use.
However, with all kinds of affordable, high-quality electronics on the market, there's nothing to say that you can’t invest in one of each! Consider the splurge if you truly can’t decide - no judgment here.
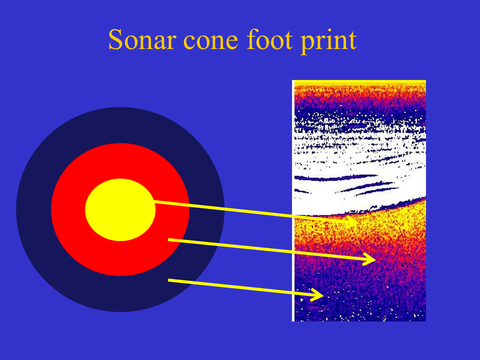
Always remember, your transducer is only showing the time it takes a signal to return and the strength of sonar return signals show the differing bottom hardness. This palette uses yellow to show the strongest sonar returns, so harder bottoms show as yellow, then red and a soft bottom, blue.
The green arrows point to what appears to be a hard layer beneath a soft bottom. Sonar does not penetrate below the surface of the bottom. The reason the yellow is below the red is because it is showing a harder area on the edge of the cone, which takes longer for the sound to return because it is farther from the transducer than at the center of the cone.
Sonar shows how far the target is from the transducer therefore the edge of the cone is farther from the transducer.
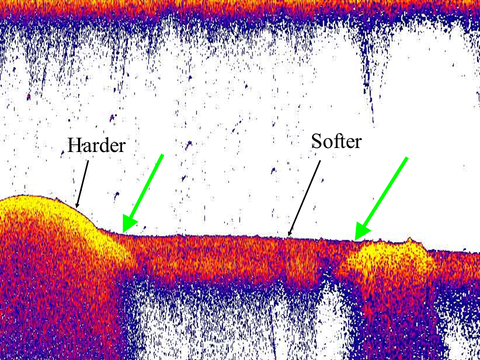
You will notice the sonar “bottom” usually has the strongest return first then the next strongest after that. The diagram shows the layering of the colors. The center of the cone has the strongest signal and it weakens at the edge of the cone. Since it is weaker at the edge of the cone the returning signal at the edge of the cone is weaker and farther away so what you see is what the below diagram shows.
This example shows a fish over soft bottom but near hard bottom.
The green arrows point to harder bottom on the edge of the cone.
