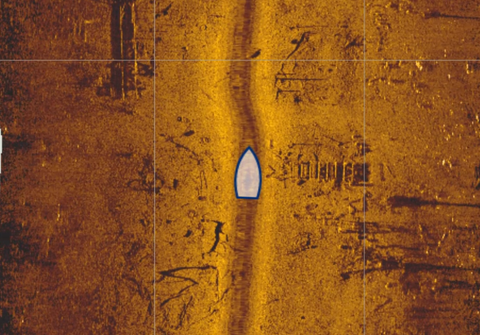
Warren Parson captured some great video of flooded structure on Devils Lake with his Aqua-Vu HD camera
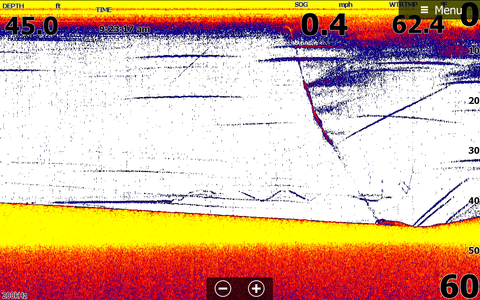
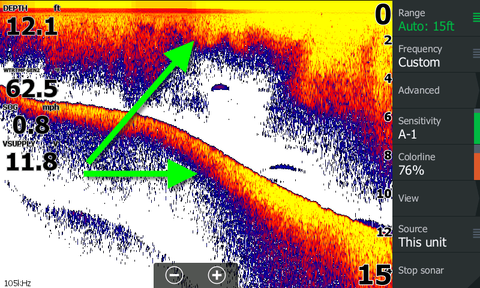
Identifying fish size on sonar is very difficult since you can change the size with sensitivity adjustments or depth range. Fish look larger on a depth range of 20 foot than 100 foot. The size of a fish is determined by the color of the fish arch. For example if you have palette colors yellow, blue and red. The more yellow you see the bigger the fish. The thickness of the fish arch also determines fish size. How long the fish arch is just how long the fish is below the transducer.
In the image the black vertical lines show how long the fish is under the transducer and the green lines show the thickness of the fish arch.
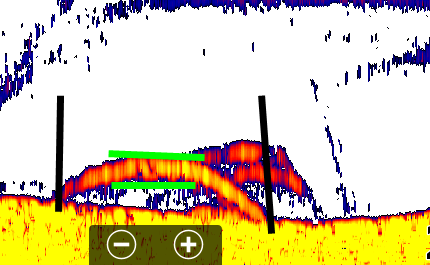
The best way to tell size is catch one the fish you see on sonar or use an Aqua-Vu camera.
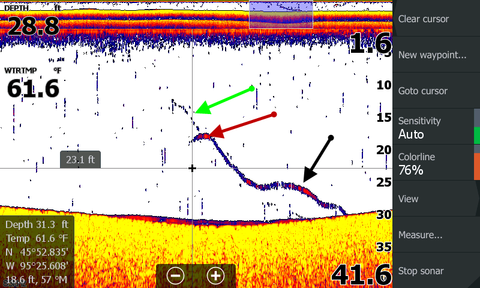
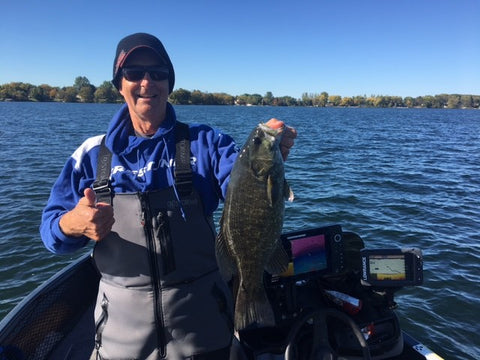
The first example shows my bait dropping (green arrow), the bait is intercepted by a bass (red arrow) and the bass swims to the bottom (black arrow) and then I set the hook and catch him.
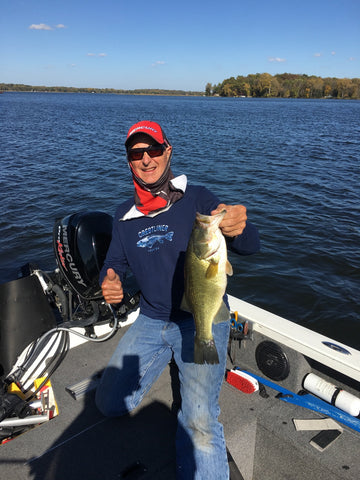
This is the bass.
How about these fish. Needless to say I was excited when I found them but they didn't bite so I dropped the Aqua-Vu camera and was surprised what I found.
Watch video of fish
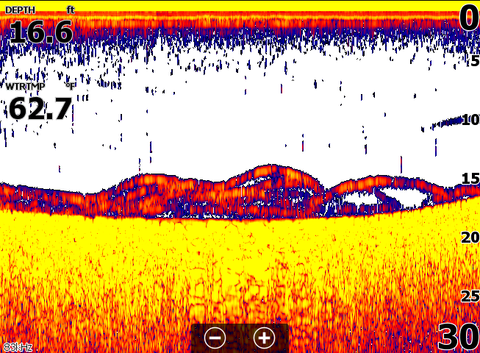
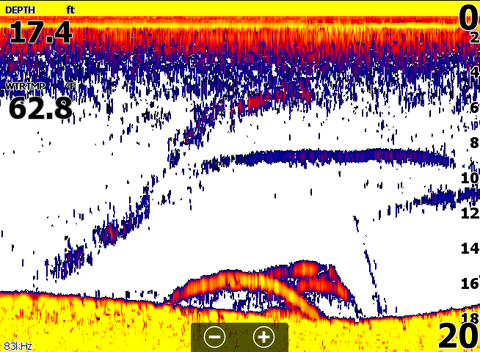
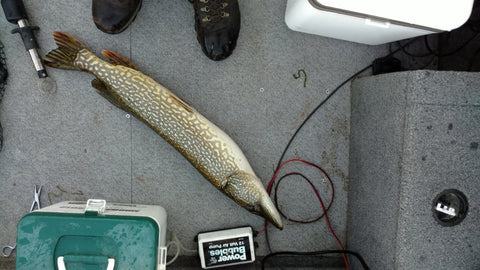
On this screenshot is a 7.5 lb. northern pike, you can see when I set the hook and started bringing him to the surface.
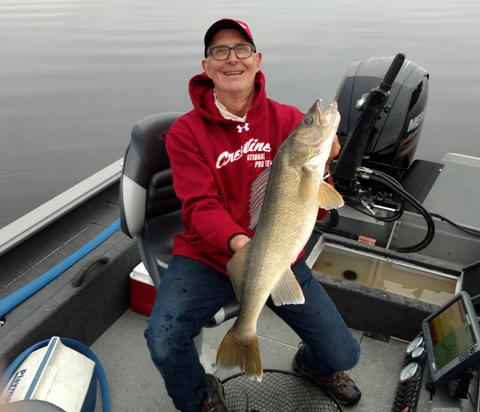
The last screenshot is smallmouth bass and I caught a few, this is a picture of one of them. One of my favorite fish to catch.

This screenshot shows a 29.5 inch walleye after being released.
I was lucky in my timing to collect good data to prove fish size on sonar.
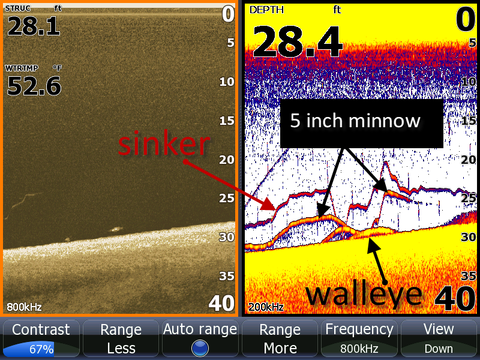
Last but not least is what a 5 inch minnow attached to a sinker looks like with 1.5-2.5 lb. walleyes below it.
Learn how crappies display on different sonar brands.
Crappies are a much sought after fish and I get a lot of questions about what they look like on sonar. Crappies often suspend over open water, making them difficult to target. In this session I will show what they look like on different sonar brands.
Image #1 shows crappies on a 2D Garmin sonar using High Chirp.

Image #2 shows the same school with a Humminbird using the MEGA transducer on High Chirp.

Image #3 is the same school using a Lowrance TM150 transducer set at 105 kHz frequency.
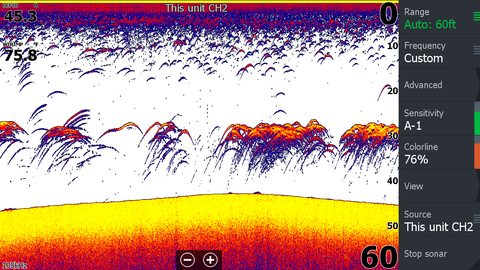
Image #4 shows the same school with the Humminbird side imaging
Next are 2 videos showing the Panoptix with 2 different transducers. The PS 30 looks down and to the side and the PS 21 looks to the side.
I use side imaging or the PS 21 to find the school when it moves since they see to the side and I use Minn Kota Spot Lock to sit on the school and vertically jig for supper.
PS 21 video
PS 30 video
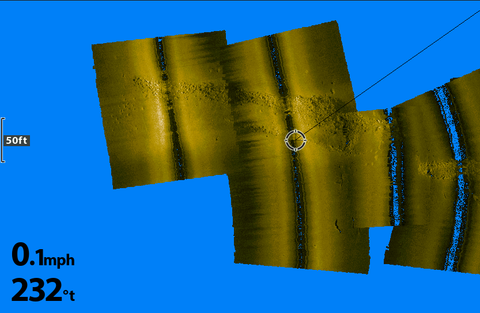
You can make mosaics with Humminbird Helix models using Autochart Pro which is a computer app. You record the sonar data to a blank card and use Autochart Pro to make the mosaic and export it as a mosaic to your Helix. You will use it as the chart with your boat cursor on this map. If you find tech easy this is a good way to use Spot Lock on your favorite reef spot.
I produced this short video using sonar, down imaging and an Aqua-Vu to show you how I interpret sonar.
Click on image to view video

It’s that time of the year, many are getting a new boat with electronics or are outfitting an existing boat with new electronics. Here are some things to think about when looking at purchasing new electronics. Use this as a checklist to help you make a educated decision.
And a few install tips are also thrown in.
- What is your budget?
- Prices range from 100.00 up to the sky is the limit.
- Get the biggest screen you can afford. A common comment at shows is “I wish I would purchased a bigger sonar screen when I bought my boat last year”. Many dealers will throw in 3” screen and you think oh boy a sonar and GPS! After you become experienced with the boat that 3” screen will not cut it. 7” screen size minimum size IMHO.
- What kind of boat?
- Tiller or console? This can affect what units will be right for your situation and you may save some money.
- How much room or clearance do you have to mount a unit?
- If you have a walk thru windshield you may not be able to fit a 12” screen like a tiller or side console.
- What do you have currently on your boat?
- Maybe you can repurpose this to another location or 2nd unit to serve as the GPS/Map screen or a bow unit.
- The 2 networking systems are-
- Ethernet (High speed data transfer, sharing screens, maps, waypoint management)
- NMEA 2000 (Data transfer, monitoring engine data, GPS modules, trolling motor control)
- Not all sonars have these capabilities.
- Do you own a Smart Phone or Flip Phone? The old keypad sonar technologies are similar to operating a Flip Phone! Try a touch screen sonar like the Elite Ti and Gen units and you will note how fast they are to navigate around the screen and menus. You will be amazed! And yes Lowrance work cold or wet unlike a smart phone. Go find a flip phone and try and text someone you will be looking for your smartphone right away. And the prices on the touch screen units such as the Elite Ti starting at 499.00 and up.
- Do you plan on networking to another sonar now or in the future?
- If you plan on just having a single unit now and forever why spend the extra money on units that have the networking capabilities? Example Lowrance Elite Ti without networking –vs.- HDS Gen units with networking capabilities or some Humminbird Helix Gen 1 models vs. the Gen 2 models.
- If you are buying a tiller and never plan on networking to another unit get a unit like the Elite Ti, Hook or Gen 1 Helix without Ethernet and you can spend the extra money saved for a bigger screen
- If have a console boat and plan on networking to another unit on the bow or in the future get a unit such as the Helix Gen 2 series or HDS with Ethernet so you can hook to another Gen unit and share data back and forth. Why waste the money on a non-networkable unit now then only to add another unit to the bow later and lose out on the networking bonuses.
- Do some research on how the networking works.
- Is the unit mounted in such away that the built in GPS module will be obstructed from the sky and satellite’s?
- You may need an external antenna to get a signal.
- If you fish slow or like to cast a heading sensor like the Lowrance Point-1 or Humminbird AS GPS HS will greatly assist in boat control and fishing by always showing which way the front of the boat is facing.
- The internal GPS antennas are excellent but do show which way the boat is facing until you start moving forward.
- Look at incorporating the latest sonar technologies such as-
- DownScan/Down Imaging
- SideScan/Side Imaging
- Chirp Sonar
- Radar
- Radio
- Bowmount trolling motor control? Many types of sonar can control a trolling motor and steer the boat with an autopilot feature or route programmed into the sonar. Anchor mode/Spot Lock saves your back or your partner will thank you for not having to pull an anchor.
- Do you troll with the main motor or kicker? Add an autopilot feature that will steer your boat while you fish. It will keep your boat on a course while you are reeling in and netting fish or deploying lines.
- If you are unsure about installing a system utilize reputable installer. It will make your time on the water much more enjoyable when it all works correctly.
- Getting the transducer at the correct placement can be a trial and error task to get a good signal at high speed.
- Use a plastic transducer board to mount transducers. It’s easier to drill more holes in the board than your boat if you make a transducer location mistake.
- Make sure to add a mapping card with more details. Units come with base mapping and it’s just that 3’ to 6’ contours or just a lake outline. Cards from companies like Navionics, Lowrance and LakeMaster give 1’ contours on many lakes that will enhance your fishing experience and save your lower unit from a date with a rock.
- Don’t use wimpy sonar mounts! Bigger is better that 9” sonar mounted on a 1” ball mount will be slapping against the dash on the first big wave!
- Many of the new outboards can be connected to sonars and get engine data right on the sonar screen. Doing away with expensive and antiquated dash mounted gauges.
- More and more units can do live mapping on the screen. Lowrance recently incorporated Navionics SonarChart Live into the Elite Ti, Gen 3 and Carbon units, Humminbird Helix models have AutoChart Live, and Garmin has Quickdraw. You can make your own map of bodies of water with no maps or poor mapping.
- Batteries don’t skimp here! Get the biggest starting battery you can or a second house battery for electronics they draw a fair amount of power and stranded on the lake with a dead battery is a bummer.
- A good house battery is the Optima D31M. Doc and his pro staff mark O’Neill and Kirt Hedquist use them because bigger is better.
- And also use Optima D31M for the trolling motor batteries.
- Go to com and follow Doctor Sonar on Facebook and read the tutorial articles on understanding sonar.
Watch the short video to get an understanding why weeds are important for fishing.
Watch Video
Side imaging produces nice images of how boulders really look like and I use it to find key spots that I miss with 2D and down imaging sonar.
This image is a boulder reef. On this image the biggest boulders are next to smooth bottom. This also means there is probably a dropoff next to the boulders. Walleyes like transitions, big boulders and dropoffs so I have 3 key ingredients to start my hunt for groceries for my famous fish tacos. I don't see any fish but fish are difficult to see in boulders since they also show up as white.
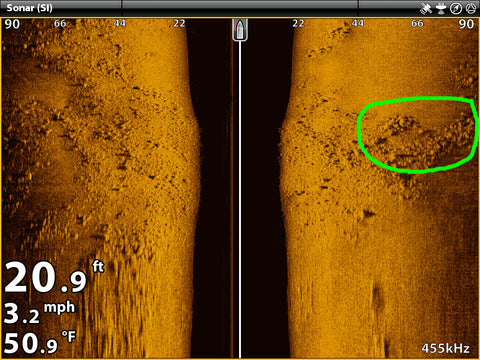
This link will show an Aqua-Vu video of the transition. watching it confirms it is a good spot and helps understand the side imaging
Aqua-Vu video
Ever wonder what to do when you are slowly moving jig or rig fishing and lose the fish on sonar?
I had these fish near weeds located with down sonar (2D and down imaging).


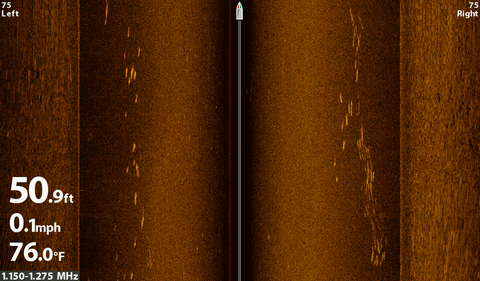
If they disappear I look at the side imaging on a different screen to see if they are left or right. Like this image.
I place the cursor on the fish on the side imaging and create a waypoint and then move the boat to the fish before they move too far. It is easy, once you catch a few fish this way you add it to your fishing tools.

Understanding bottom hardness is vital to understanding and catching walleyes.
Sometimes it is easy like this image with the hard bottom on the left.
I use Auto-sensitivity on my Humminbird and Lowrance models almost always. It works so well we never notice when it adjusts. Auto-Sensitivity mainly adjusts for depth. We need a higher sensitivity in deeper water since the sound that returns as you go deeper becomes weaker. A manual setting of sensitivity for 10 feet to get the optimal image would not show fish at 100 feet and this is where Auto-Sensitivity shines.
I’ll use examples from this summer when there were a lot of microorganisms in the water so you see a funny screen to help understand what is happening when the auto-sensitivity is working.
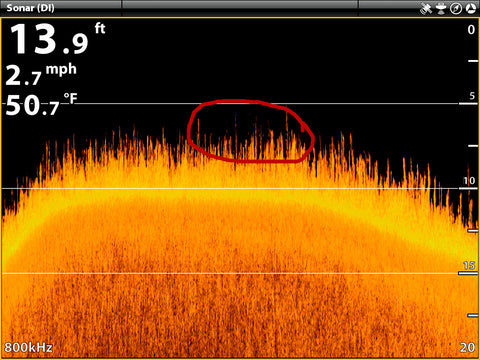
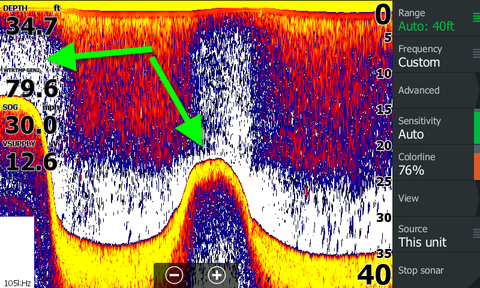
The first image shows rapid depth changes at a speed of 30 mph. Notice the clutter clears when I go shallow (green arrows).
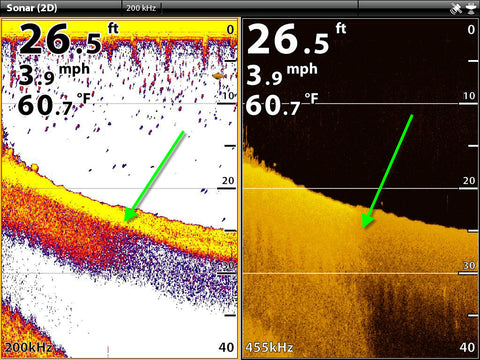
The next image shows the suspended clutter change as I go up the slope. At the same time as the clutter changes, the bottom changes (green arrow). The Auto-Sensitivity has decreased the sensitivity at a certain depth. It is important to understand this when you are trying to determine bottom hardness as walleyes are often found by finding hard bottom.
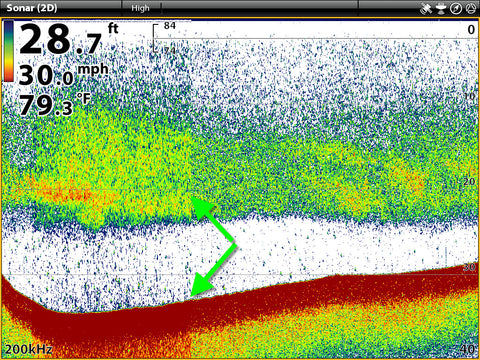
The 3rd image shows what appears to be harder bottom on the right side of the image but this is caused mainly by the Auto-Sensitivity increasing the sensitivity as I go deeper (green arrow).
Harder bottom has a wider bottom band and stronger colors like the yellow. It is easily to fooled by this image and think there is a transition from soft to hard bottom which walleyes often prefer.
Auto-Sensitivity is a great feature but understanding its limitations is important for hunting hard bottom which can result in you greasing the pan for walleye more often.