Interpreting sonar, down imaging and side imaging is very difficult. I have 3 great images to use as examples for teaching interpretation of sonar.
The left side imaging is showing the drop-off as dark (yellow arrows point to the drop-off on the map and side image). Bright is the strongest return and black is none. Since sound goes in a straight line the drop-off is dark.
The red circle is showing fish on the shallow side and I think they are about where the red arrow is pointing on the map. I would mark a waypoint on the side image and cast to the fish since they are shallow. Notice the boat is in 2.9 feet.

The next image shows the drop-off as dark (red circle) and fish are suspended near the drop (yellow arrow). Fish show up well on side imaging since they show up as bright on the dark background. Hard bottom is also bright which makes fish difficult to see on bright background.

This is an amazingly clear image of boulders (green arrow) next to trees (yellow arrow) that slid from the bank into the river.
The red arrow shows a fish in the trees and the white arrow shows a small drop-off.

Don’t miss supper, get better at sonar and fish where there are fish. Use the splitscreen sonar and down imaging and compare the two and you will become an expert.
Down imaging has a narrow wide cone and the 2D sonar has a round cone so they view targets differently and comparing the two makes interpreting sonar much easier.
This image is showing trees and the 2D sonar on the left is difficult to interpret but the down imaging shows the trees well.
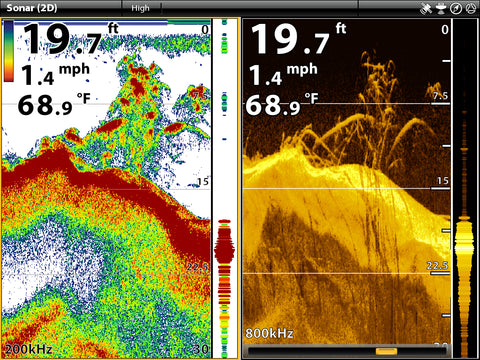
This image shows fish on the side of a boulder but the down imaging shows 2 fish and I get much more excited seeing two fish than one.
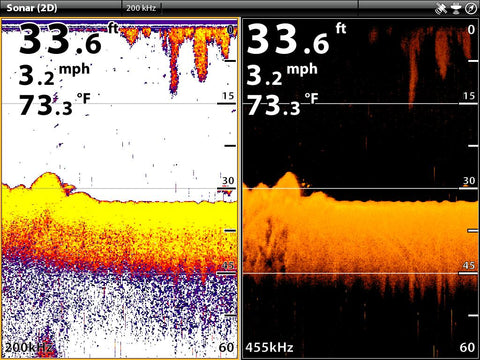
This image shows 2 bait balls in weeds (yellow and green arrows) that the 2D sonar looks like weeds.
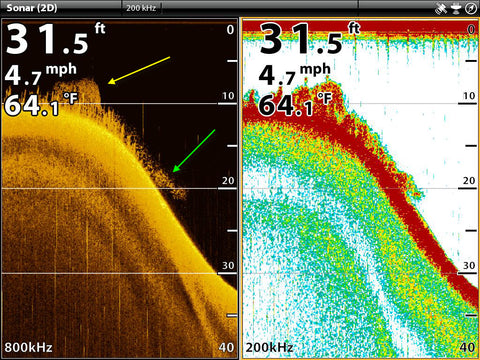
This image looks like stacked fish because of the arches but it is a common when you have posts or trees.
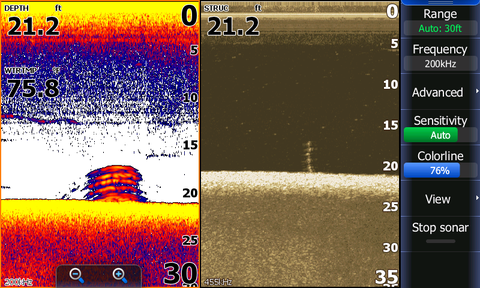
On this image the bait ball and the larger fish near it are missed with 2d sonar.
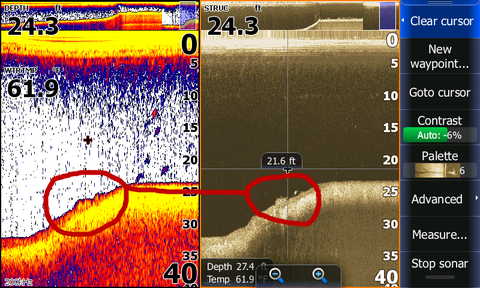
I see images like these everyday on the water since I usually run down imaging with 2d sonar. If you miss a fish on sonar you may miss supper.
DownScan Interpretation
This explanation is to help explain what you see with down imaging, it is pertinent to all brand’s down imaging.
Down imaging has a wider cone and will show targets off the side better than the 2D sonar (traditional sonar 200 kHz).
Notice the man-made structure plus the rocks.
Sonar tells us the distance to the target. The man-made structure pointed out with the white arrow is 8 feet from the transducer. How about the red arrow? It is pointing at rocks and long strips of something man-made. You can’t tell which side it is on since the left and right edge of the cone is combined, something 12 feet from the transducer on the left with be superimposed on something 12 feet from the transducer on the right side.

If you have side scan you can see which side of the boat a target is.
Notice the rocks are opposite the man-made structure but on the DownScan they are overlapped.

The next example shows fish by a tree on DownScan and the side scan shows the same fish to the left side. The problem is we don’t have enough screens to show all we want. I like to see the map, 2D sonar, down imaging and side scan and that is a lot of dash space to be used. The fish and the tree look like white spots and are hard to interpret. I like one model with splitscreen sonar and DownScan and one splitscreen map and side scan with the side scan using 2/3 of the screen since wide screens are best for side scan like I used 2/3 for sides can in the image.

Learn how to interpret your Humminbird

Read More >>
Content on Humminbird, Vexilar, Lowrance mapping, Spotlight Scan and more coming soon.


